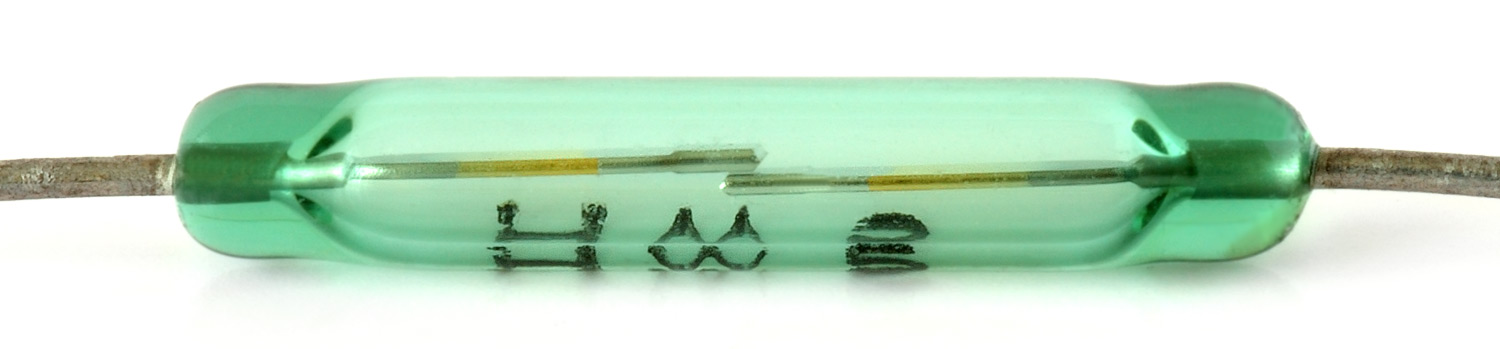
Archive for the ‘Arduino / Freeduino’ Category

Electronics Component Kit by NKC Electronics

Friday, April 22nd, 2016

The Electronics Component Kit (ECK) is ideal for electronics beginners looking to experiment with all sorts of components and experienced engineers looking to replenish his/her stock of components.

The kit includes:

Component Quantity
Plastic Box 1
Electrolytic Capacitor (4.7uF, 10uF, 47uF, 100uF, 220uF) 5 pcs each value
Jumper Wires, pack of 65 1
Breadboard 170 PTS 2
Speaker 0.5W 8ohms 1
NPN Bipolar Transistor S8050 5
PNP Bipolar Transistor S8550 5
NPN Bipolar Transistor S9013 5
PNP Bipolar Transistor S9012 5
Round Magnet 1
Ceramic Capacitor 50V (0.01uF, 0.1uF, 1uF, 0.047uF, 0.47uF) 10 pcs each value
Red LED 5
Yellow LED 5
Green LED 5
White LED 5
White Straw Hat LED 5
Red Straw Hat LED 5
Green Straw Hat LED 5
Blue Straw Hat LED 5
Diode 1N4148 10
Reed Switch 1
Photo Resistor 1
Thermistor 1
Buzzer 5V 1
7-segment LED display (Red) – Common Cathode 1
Potentiometer with knob 1
Resistor 1/4W 5% (100, 470, 1K, 4.7K, 10K, 20K, 47K, 100K, 200K, 510K, 1M) 10 pcs each value
74HC595 IC 1
IRF520N N-Channel MOSFET Transistor 1
LM386 Audio amplifier IC 1
NE555 timer 2
LM741 OPAMP 1
CD4026 7-segment driver 1
Microphone 1
Push Button 50mA 5
2032 Battery Holder 2
Parts List 1

We will be publishing more information about each component and example projects.

Assembling the breadboard power supply dual 5V and 3.3V

Tuesday, July 3rd, 2012

Modern microcontroller projects require the use of multiple voltages to combine different parts. It is very common to prototype circuits that require both 5V and 3.3V (i.e. Arduino projects that use sensors or micro controller boards like chipKIT that interface with 5V devices, etc).

We created a breadboard power supply stick that provides both 5V and 3.3V. The voltage selection is user selectable, so you can power both power buses on a breadboard with same 5V, same 3.3V or mix 5V and 3.3V on the different buses.

The product comes fully assembled, except for the male headers that are provided unsoldered. Breadboards are slightly different in size, so doing the final soldering we can assure you have the best fitting product to your specific breadboard. Differences are tiny, but you can find the best fit doing the final soldering.

First, unpack the kit

BBPS

Start by breaking the male header

  • 5 x 2-pin
  • 2 x 3-pin

BBPS

Insert 2 2-pin male headers on one of the power bus, then insert 2 other 2-pin male headers on the other power bus.

BBPS

Insert the power supply stick matching the 8 pins to the 8 power holes and solder

BBPS

Solder the 2 3-pin voltage selection headers, then place the jumpers based on your voltage needs. Plug a 7 to 12V DC supply to the 2.1mm barrel jack and you will have a working breadboard power supply stick.

http://www.nkcelectronics.com/

Assembling the NKC Electronics XBee Shield V4.0 KIT

Tuesday, November 1st, 2011

Assembling the NKC Electronics XBee Shield V4.0 KIT

SCHEMATICS (click on images to enlarge)
xbee shield v4.0 schematics

The NKC Electronics XBee Shield V4.0 KIT is an enhanced version of the original Arduino XBee Shield. It is sold in a DIY kit format and it comes with all the components required to assemble a full XBee Shield that is pin-compatible with all Arduino format compliant boards (Arduino, Freeduino, Seeeduino, chipKIT, etc).

V4 includes some new features, like a switch to select XBEE or USB instead of jumpers. This switch, re-routes RX and TX at the same time, so if for some reason, you still need to switch RX to one position and TX to the same position, then solder a 2×3 male header instead of the provided switch, and use jumpers to select the position you need.

First, unpack the kit

Xbee Shield V4.0 KIT

and start with the PCB.

Let’s start with the power section and the switches of the schematic using the following parts:

IC1 LD1117-33 Voltage Regulator (TO-220 package)
C1 100nF ceramic capacitor
C2 10uF electrolytic capacitor
reset tactile switch (4 legs)
XBEE/USB DPDT micro switch (6 pins)

xbee shield v4.0 KIT

Next continue with the transistor, LEDs and resistors:

xbee shield v4.0 KIT

R1 10K resistor 
R2 15K resistor 
R3 1K resistor 
R4 330ohm resistor 
R5 18ohm resistor 
RSSI 3mm LED yellow
ASSOCIATE 3mm LED blue (transparent)
T1 BC547 transistor

Solder the sockets and pin headers:

xbee shield v4.0 KIT

Next step: Insert the jumpers and the board is completely assembled:

xbee shield v4.0 KIT

There are 2 jumpers. J1 and J2 are for upgrading the firmware on the XBee module. Leave open for normal operation (both J1 and J2 open).

The XBEE/USB switch is used to route the RX and TX signals from the XBEE module to the Arduino board.  Select XBEE position if you want to communicate the XBee module with the ATmega chip on the Arduino (or compatible) or PIC on the chipKIT board.  Select USB if the board does not have the microcontroller installed and you want to use the USB interface to communicate the PC directly to the XBee board.

And this is the final picture of the XBee Shield V4.0 assembled and ready to use. XBee module is not included in the kit and must be purchased separately.

xbee shield v4.0 KIT

http://www.nkcelectronics.com/

RGB LCD Shield for Arduino 65K color KIT V2 Assembly Guide

Sunday, January 2nd, 2011

The RGB LCD shield for Arduino 65K color KIT includes all the components to assemble a ready to use LCD shield for Arduino and compatible boards like Freeduino.

First the schematics:

The LCD module has a backlight made of 2 white LEDs that requiere approximate 9V with a max 19mA current to work.  As this voltage level is not available on the Arduino board, I used an ST232 RS232 driver to get 8V DC from the standard 5V Arduino power supply.  The backlight driver circuit now included in the main RGB LCD shield PCB.

The first step is to unpack the KIT.

It contains the following components:

1 x RGB LCD module

1 x RGB LCD shield PCB

1 x LCD module to PCB soldering adapter

1 x LM317T variable voltage regulator

2 x 10uF electrolytic capacitors

5 x 0.1uF ceramic capacitors

1 x 330 ohm resistor

1 x 430 ohm resistor

5 x 1Kohm resistors

5 x 1.3Kohm (1K3) resistors

1 x 28-pin male breakable header (you need to cut 2 8-pin sections, 2 6-pin sections)

1 x ST232 RS232 driver IC

1 x 110 ohm resistor

Let’s start with the main RGB LCD shield PCB.  The LCD module needs to be soldered first.  Separate the LCD module and a small green thin PCB used to attach the LCD module to the main black PCB.

Apply some solder in one of the pins of the LCD module, you can choose either pin 1 or pin 10 (pin 1 is the one to the right of the picture).

Once the solder is applied, place the small thin PCB and align the 10 pads to the 10 pads on the LCD module.  Heat the pin that has the solder to attach the small thin PCB (the adapter).  Once you are satisfied how it is aligned (make sure the pads are correctly aligned, to avoid shorting the pins), solder the rest of the pads.

Now it is time to solder the LCD module to the main black PCB.  The process is the same, apply some solder in one of the pins (1 or 10) and align the LCD module with the adapter to the 10 pads on the black PCB.  Solder all the pads.  Be careful to not add excessive solder to create shorts in the pads.

The LCD part is done.  We need to check for any short circuits before advancing in the assembly process.

Next we are going to solder the headers.  Cut the included 28-pin male header into 2 x 8-pin and 2 x 6-pin headers.  The picture shows a female 2×3 header that is not included and is not needed in the new version of the KIT.

Solder the pin headers and plug it into the Arduino (Freeduino, Seeeduino, *duino) board to check it is not causing any short to the main board.

Unplug the RGB LCD shield from the main board and let’s continue with the Power Supply (Voltage regulator).  This part of the circuit, takes 5V from Arduino and using the LM317 variable voltage regulator, generates 2.9V to supply the LCD module.  The components are: LM317T, 1 x 10uF electrolytic capacitor, 2 x 0.1uF ceramic capacitor, 1 x 430 ohm resistor and 1 x 330 ohm resistor.

Solder first the LM317 voltage regulator.  Then you can solder the 0.1uF ceramic capacitors C2 and C3.  Orientation is not important for the ceramic capacitors.  Then solder the 10uF electrolytic capacitor, negative leg to the left, positive (long) to the right.  Next you need to solder R12 430 ohm resistor (you can follow the guide in http://www.bpesolutions.com/atechnical/ResistorQV.pdf to calculate the resistor colors).  430 ohms is yellow, orange, brown.  Then solder R13 330 ohm resistor (orange, orange, brown).  The power supply section is complete.

This is how the board looks now with the power supply section ready

Plug the RGB LCD shield back into the main board and verify that there is no short circuit.

And make sure you get 2.9V from the voltage regulator following the next 2 pictures…

Next solder the 10 resistors used to create the logic level converter from 5V to 2.9V.  We will be using 5 x 1K and 5 x 1.3K (or 1K3) resistors.  1K resistors are coded brown, black, red and 1.3K resistors are coded brown, orange, red.

This is how the board looks with the voltage dividers (10 resistors) soldered.

Next we need to assemble the step-up circuit.  You need the MAX232 (or compatible) chip, 1 x 110ohm resistor (current limiting resistor for the LCD backlight), 1 x 10uF electrolytic and 3 x 0.1uF ceramic capacitors.

And this is how the complete assembled RGB LCD shield looks like

The final step is to insert the RGB LCD shield into the main board and run some tests

The sample code is self explanatory (You don’t need to mess with the setup code, just look for the piece of code that sends the characters to the screen, how the dots are turned on and off, etc.  I created 2 codes, one using digitalWrite() and another one using direct AVR I/O… I found the 2nd method to be almost 10 times faster, and drawing things on the screen, you can notice the difference in speed.

The sample codes are here:

Sample using digitalWrite()

Sample using direct AVR I/O

Click on the source code and copy the contento to Arduino, or download the .txt files and rename them as .pde

RGB LCD Shield for Arduino 65K color KIT Assembly Guide

Friday, April 16th, 2010

The RGB LCD shield for Arduino 65K color KIT includes all the components to assemble a ready to use LCD shield for Arduino and compatible boards like Freeduino.

First the schematics:

The LCD module has a backlight made of 2 white LEDs that requiere approximate 9V with a max 19mA current to work.  As this voltage level is not available on the Arduino board, I used an ST232 RS232 driver to get 8V DC from the standard 5V Arduino power supply.  The backlight driver circuit is in a separate board (yellow) that will be inserted on top of the RGB LCD shield PCB.

The first step is to unpack the KIT.  It contains the following components:

1 x RGB LCD module

1 x RGB LCD shield PCB

1 x LCD module to PCB soldering adapter

1 x LM317T variable voltage regulator

2 x 10uF electrolytic capacitors

5 x 0.1uF ceramic capacitors

1 x 330 ohm resistor

1 x 430 ohm resistor

5 x 1Kohm resistors

5 x 1.3Kohm (1K3) resistors

1 x 40-pin male breakable header (you need to cut 2 8-pin sections, 2 6-pin sections and 1 1-pin section)

1 x 2×3 long leg female pin header

1 x DC step up PCB (yellow)

1 x ST232 RS232 driver IC

1 x 110 ohm resistor

1 x 6-pin female header

1 x 2×3 pin female header

Let’s start with the main RGB LCD shield PCB.  The LCD module needs to be soldered first.  Separate the LCD module and a small green thin PCB used to attach the LCD module to the main black PCB.

Apply some solder in one of the pins of the LCD module, you can choose either pin 1 or pin 10 (pin 1 is the one to the right of the picture).

Once the solder is applied, place the small thin PCB and align the 10 pads to the 10 pads on the LCD module.  Heat the pin that has the solder to attach the small thin PCB (the adapter).  Once you are satisfied how it is aligned (make sure the pads are correctly aligned, to avoid shorting the pins), solder the rest of the pads.

Now it is time to solder the LCD module to the main black PCB.  The process is the same, apply some solder in one of the pins (1 or 10) and align the LCD module with the adapter to the 10 pads on the black PCB.  Solder all the pads.  Be careful to not add excessive solder to create shorts in the pads.

The LCD part is done.  Let’s continue with the Power Supply (Voltage regulator).  This part of the circuit, takes 5V from Arduino and using the LM317 variable voltage regulator, generates 2.9V to supply the LCD module.  The components are: LM317T, 1 x 10uF electrolytic capacitor, 2 x 0.1uF ceramic capacitor, 1 x 430 ohm resistor and 1 x 330 ohm resistor.

Solder first the LM317 voltage regulator.  Then you can solder the 0.1uF ceramic capacitors C2 and C3.  Orientation is not important for the ceramic capacitors.  Then solder the 10uF electrolytic capacitor, negative leg to the left, positive (long) to the right.  Next you need to solder R12 430 ohm resistor (you can follow the guide in http://www.bpesolutions.com/atechnical/ResistorQV.pdf to calculate the resistor colors).  430 ohms is yellow, orange, brown.  Then solder R13 330 ohm resistor (orange, orange, brown).  The power supply section is complete.

This is how the board looks now with the power supply section ready

Next solder the 10 resistors used to create the logic level converter from 5V to 2.9V.  We will be using 5 x 1K and 5 x 1.3K (or 1K3) resistors.  1K resistors are coded brown, black, red and 1.3K resistors are coded brown, orange, red.

This is how the board looks with the voltage dividers (10 resistors) soldered.

The next step is to solder the headers.  You need to break the 40-pin male header into 2 8-pin section, 2 6-pin section and 1 1-pin section (just grab 1 pin and twist it until it breaks).

Solder the pin headers.  The male headers are inserted from the bottom of the PCB to the top.  Once soldered, you need to plug this shield to the Arduino board, so you need the long side of the pin header going downwards.  The 2×3 female header is soldered backwards, also from the bottom of the PCB to the top, but long leg first.  You will also apply solder on the top side of the PCB.  Remember that the ICSP pin header on the Arduino board is male, while all the other headers are female.  The 6-pin headers are not easy to insert, as the holes are not aligned on purpose to make them fit better.  Push this headers all the way in.  You will notice slight bending of the pins, but it is ok.  It will make the shield fit tighter on the Arduino board.

It is easier to know how all the headers go if you look at the picture of the finished board.

The last pin you need to solder on the main black PCB is the 1-pin header.  It goes on the left pad of R11.  You can see R11 is empty.

Next step is to assemble the DC step up converter.  This little yellow board converts 5V from the Arduino board to approx 8V.  It is enough to drive the white LED backlight.

I was looking for a “true” step-up converter, but they are packaged in tiny tiny devices, almost impossible to solder.  So I realized that the ST232 with a couple of capacitors can generate 7-12V (even negative!), and they are cheaper than “true” step-up converters and needs less external components, so I tested this circuit and it worked just fine.  Added a 10uF capacitor to filter the 8V output.  This 8V goes to the Anode of the LCD backlight, but through a current limiting 110 ohm resistor.  This tiny board is very easy to assemble, just insert all the components (ST232 chip, 1 6-pin female header, 1 2×3 female header, 3 x 0.1uF ceramic caps, 1 x 10uF electrolytic cap, 110 ohm resistor).

And here is the board assembled.  This tiny board must be inserted in the RGB LCD shield board by using the ICSP header and one of the 6-pin female headers.  Remember the 1-pin header that you soldered on the left pin of R11?  OK, you need to align the 2nd pin from the left of this tiny board to the 1-pin header on the main board.  The 6-pin header, viewed from the top, has the following pinout: [GND] [8V] [GND] [GND] [5V] [GND].  [8V] pin must be inserted in the 1-pin header on the main board.  The GND comes from the ICSP header.

And this is how everything looks when the tiny board (step-up converter) is inserted, the board is plugged to USB and you upload the sample sketch to the Arduino board.

The sample code is self explanatory (You don’t need to mess with the setup code, just look for the piece of code that sends the characters to the screen, how the dots are turned on and off, etc.  I created 2 codes, one using digitalWrite() and another one using direct AVR I/O… I found the 2nd method to be almost 10 times faster, and drawing things on the screen, you can notice the difference in speed.

The sample codes are here:

Sample using digitalWrite()

Sample using direct AVR I/O